Maintaining Functionality through Hip Joint Exercises
by ACE Physical Therapy and Sports Medicine Institute
Tips for Hip Joint Exercises.
- Seek advice from your Physical Therapist if you develop hip pain or want to know a good exercise routine for your hips.
- Stretching daily (several times per day) is the best way to gain flexibility.
- Core strength must be present to enable all other body parts to work efficiently.
- Arthritic hip pain is usually felt in the groin area.
- Hip pathology can “present” as low back pain. Have your Physical Therapist evaluate your back and hip and they will be able to diagnose the origin of the symptoms.
Designed for motion and stability, the hip joint affects a person’s ability to perform almost all aspects of daily living. Over time, the stresses of daily activity can impact the functionality of the hip joint. Regular conditioning through hip joint exercises can help increase functionality for a lifetime.
Design of Hip Joint
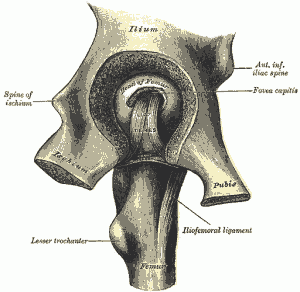
Similar to the shoulder, the hip joint is a “ball-and-socket” joint. Unlike the shoulder, this joint has increased depth that enables the bones to be more stable while freely functioning in every plane of motion. The shape and construction of the hip joint help us to perform a vast array of activities in our lower extremities.
Most Physical Therapists will consider it part of the “core” since the hip joint is part of the pelvis, and they will always incorporate “hip” exercises when they are treating a patient with an injury that involves torso or lower extremities. The importance of its strength and flexibility cannot be measured, but if it does not function properly it can affect virtually all aspects of common day-to-day activities.
Stresses on the Hip Joint
 The hip joint relies on the bony construction, ligaments and muscles for its stability. Athletics and common everyday tasks can exert a tremendous amount of force on the joint. For example, running has been shown to place up to 7x a person’s body weight on their single leg as they transfer their weight from one leg to the next. As a result of ongoing stresses over a lifetime, the hip joint begins to “break down” (in the form of osteoarthritis) as people enter into their 5th, 6th, and 7th decade. The key to slowing down and managing the progression of an arthritic onset is maintaining flexibility and strength and when necessary adjusting one’s life’s activities.
The following series of exercises address the primary needs of the hip joint. For the best results, stretching exercises can be performed daily and strengthening exercises can be performed every other day. You can perform all of them daily for the first month to help your body get “used” to the routine. Once you begin to strength train with a day off in between, be sure to add resistance to maximize your efforts. You can always ask your Physical Therapist for more exercises that will challenge the hip joint.
STRENGHTENING
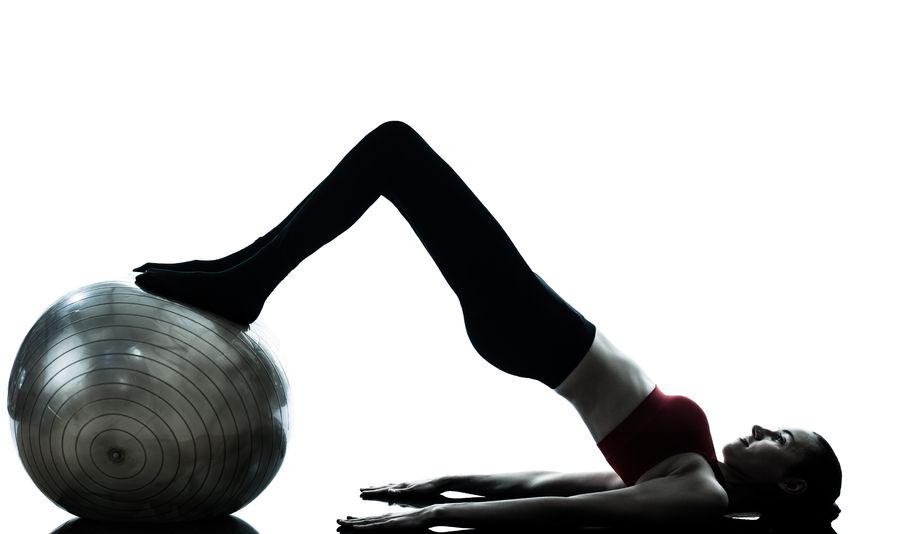
BALL PLANKS: Lie on your back and place your ankles (not your calf muscles) on a Theraball. Slowly raise your buttocks off of the ground. Pause at the top for a couple of seconds and then return to the starting position. This exercise is much harder when the arms are crossed on the chest. This arm position decreases the amount of surface area of your body that is touching the ground. An increased amount of surface area will increase stability and make the exercise easier.
BALL HAMSTRING CURLS: Lie on your back and place your ankles and heels on the Theraball. Raise your buttocks off of the table and pause. Once you get steady, slowly bend both knees as you begin to roll the ball towards your buttocks. Bring it in as far as you can, pause and then roll back to the beginning position. Try to keep your buttocks off of the ground throughout the entire exercise.
Squat: Stand in front of a chair as if you are going to sit down. Your feet should be shoulder width apart. Begin to “sit” down slowly and barely touch your buttocks to the chair seat. Return to an erect/standing position. As you lower yourself downward, your chest and head should be held upward and you should “stick out” your buttocks; don’t allow your kneecaps to move too far forward or beyond your toes. Don’t use your hands to assist the motion in either direction unless it is too difficult to perform.
Side walk with band: You must obtain a piece of Theratubing (red, green, blue or black) and tie it in a loop. The loop should be no larger than approximately 6-8 inches in diameter. Place the loop around your ankles and then stand up. Bend your knees slightly and step laterally with one foot Plant that foot, and slowly bring the other foot, without dragging it, towards the foot that began the movement. Attempt to keep some tension on the band at all times. Continue this lateral walking routine for approximately 25-50 feet in one direction. At the destination, stop and return to your starting point, but do not turn your body around. You must face the same direction at all times to get the most out of this exercise.
Donkey kicks: Begin by getting on your hands and knees (“all 4’s position”) If you have trouble kneeling down or your upper extremities cannot handle your weight in this position, you can lean over the end of a desk or counter and perform a modified version of this exercise. Assuming you are able to begin in the “all 4 position” begin by straightening (“kicking”) one leg directly behind you. This exercise has many variations, but this description will maintain a straight leg (fully extended knee) at the end point of the “kick.” The position of the ankle is not critical. Pause at the end of the “kick” and then slowly return your leg to the beginning position. Repeat on both sides and attempt to place as little weight on your hands as possible. This will force your hips and core to be the primary stabilizing structures.
“Dog at the fire hydrant”: Begin in the “all 4’s position” or the modified position if necessary. Begin by raising one leg out to the side. The knee joint is maintained in a 90 degree angle throughout the exercise. Attempt to place a minimal amount of weight on your hands. Raise the leg until the same side pelvis begins to rotate upwards, then hold that position for a brief moment. Too much rotation of the pelvis can be detrimental to the lumbar spine.
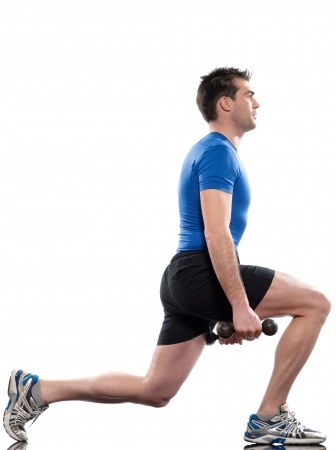
 Lunges: Stand with your feet shoulder width apart. Begin the exercise by striding forward with one leg. As the front leg makes contact with the ground begin to slowly lower yourself downward by bending your knees. The front knee should bend to approximately a 90-degree angle. You should stride out far enough so that the knee bend can be accomplished without allowing the kneecap to “travel” way beyond the toes of that front foot. The body weight should be shifted to the front leg. The back leg knee flexion is minimal and helps to stabilize the body. Once you have reached the “bottom” of the descent towards the floor, pause and attempt to push yourself forcefully back to the beginning position utilizing the front leg as much as possible to generate the force. You can think that you have stepped on something sharp or hot and you have to get off of it.
Lateral lunge: Begin in the same starting position as the lunge. Your initial stride should be at an angle. You can determine the angle that “feels” challenging, but comfortable. A 45-degree angle or stepping on the 2 or 10 o’clock is usually a good angle to start. When you stride out the same principles exist with this exercise as in the “regular” lunge. Attempt to flex the front knee to a 90-degree angle, but keep the kneecap behind or even with the toes. If they go beyond the toes slightly that is ok, it occurs during every day life activities all of the time.
STRETCHING
Hamstring stretch: Place your heel of the leg you are stretching on an object that is approximately 3-6 inches high. Keep your knee straight and lean forward at the waist. Try to put your chest on your kneecap (you will most likely not be able to do so). Do not lean forward and attempt to put your forehead on your kneecap.
“Figure 4” (Piriformis): This stretch can be performed in many variations. From a sitting position, place your Right(R) ankle on the (Left) knee. Slowly pull your R knee towards your L shoulder. Don’t twist your torso. If you cannot get your R knee entirely to the L shoulder that is ok. You will begin to feel a stretch in your R lateral buttock. When you feel the stretch, slowly move your L knee a couple inches to the L and the stretch should be intensified. Repeat this on the other side.
From a prone (lying on your back) position. Bend both knees so your feet are flat on the floor. Place your R ankle on your L knee. Begin to move your L knee towards your chest. Use both hands to assist the movement of the L leg by wrapping your hands around your L thigh and pulling your leg up towards your chest. You will feel the stretch in the lateral buttocks on the R side. Repeat to the other side.
The hip joint is subjected to tremendous stresses and forces throughout your daily life. If it is not capable of handling these forces, it will begin to “break down” and eventually cause you to lose your ability to perform almost all activity. In many cases, maintaining the flexibility and strength of the hip enables a person to remain pain free and fully functional.
Read more articles on our main website blog at: ACE-pt.org/blog
Vist our main website at: www.ACE-pt.org

